
Introduction: Transform Your Home Comfort with a MrCool DIY Mini Split System
Are you looking to take control of your home’s heating and cooling without the hassle or expense of a traditional HVAC installation? The MrCool DIY Mini Split system could be your perfect solution. This revolutionary system offers efficient, reliable heating and cooling that you can install yourself. With its user-friendly design and straightforward installation, the MrCool DIY Mini Split is making it easier than ever for homeowners to achieve year-round comfort. In this guide, we'll cover everything you need to know to install your MrCool system, from understanding its components to the step-by-step process of setting it up.
What You Need to Know Before Installation
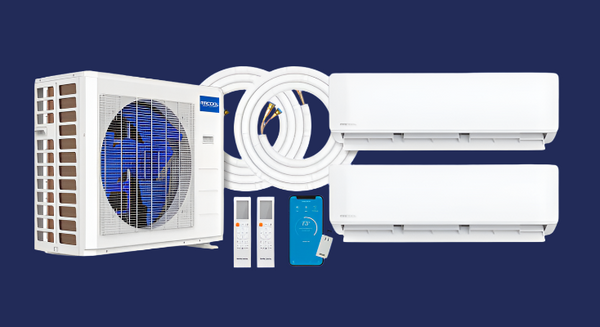
Before diving into the installation, it's essential to get familiar with the components and benefits of the MrCool DIY Mini Split. Unlike traditional HVAC systems, the MrCool system is ductless, meaning it doesn’t require complex ductwork, which reduces both the installation time and the invasiveness of the process. The primary components include:
- Outdoor Condenser Unit: This component releases the heat absorbed from your home, enabling efficient cooling.
- Indoor Air Handler Unit: This unit blows conditioned air into your home, maintaining a comfortable temperature.
- Connecting: Consisting of refrigerant lines, a power cable, and a drain hose connects the indoor and outdoor units.
Because it’s a DIY system, MrCool provides pre-charged lines that make installation straightforward. No HVAC license is required, making it accessible even for DIY beginners. Let's dive into the process so you can enjoy the full benefits of your mini split system in no time.
Step-by-Step Installation Guide for MrCool DIY Mini Split System
Step 1: Choose the Right Location
The placement of both your indoor and outdoor units is crucial for optimal performance and efficiency.
- Indoor Unit: Install this unit on an exterior wall, ideally in a central location to provide balanced air distribution throughout the room. Avoid placing it near doors or windows to prevent temperature fluctuations.
- Outdoor Unit: Place the outdoor unit on a stable, level surface to reduce vibration. Common options include a concrete pad or sturdy mounting brackets. Ensure it’s located in a shaded area for maximum efficiency and has at least 24 inches of space around it to allow for proper airflow.
Step 2: Mount the Indoor Unit
The indoor unit needs to be securely attached to a wall bracket.
- Using the Mounting Template: Use the provided wall mounting template to locate the precise spots for screw holes and the through-wall hole, making sure your bracket and unit will align perfectly. This template takes the guesswork out of measuring and ensures a clean, easy installation.
- Attach the Bracket: Measure and attach the mounting bracket at the desired height on your wall. The unit should be level to prevent drainage issues and firmly attached to the wall for stability.
- Drill a Hole for the Conduit: Using a drill, create a small hole (typically around 3.5 inches in diameter) through the wall near the mounting bracket. This hole will allow the conduit with refrigerant lines, power cable, and drain hose to pass through to the outdoor unit.
Step 3: Install the Outdoor Unit
The outdoor unit placement is critical for the longevity and efficiency of your MrCool DIY Mini Split system.
- Set on a Stable Surface: Position the outdoor unit on a concrete pad or secure brackets to keep it stable and level.
- Protect Against Elements: If you’re in an area with extreme weather, consider additional protection, like a condenser cover, to prolong the unit’s lifespan.
Step 4: Connect the Refrigerant Lines
One of the key benefits of the MrCool DIY Mini Split is its pre-charged refrigerant lines, which eliminate the need for specialized tools or a licensed HVAC technician.
- Run the Lines: Carefully feed the conduit (refrigerant lines, power cable, and drain hose) from the indoor unit through the hole in the wall to the outdoor unit.
- Attach the Lines: Attach the refrigerant lines to the connectors on both the indoor and outdoor units. MrCool provides clear, labeled fittings that make this process straightforward.
Step 5: Make Electrical Connections
Connecting the electrical components requires attention to detail and strict adherence to safety guidelines.
- Follow the Manual: MrCool’s instructions provide detailed steps for wiring the indoor and outdoor units. Typically, you’ll connect the power supply to the outdoor unit, which then connects to the indoor unit through a communication wire.
- Safety First: If you're uncertain about electrical work, consider hiring an electrician for this step. Safety is paramount, especially when dealing with high-voltage connections.
Step 6: Secure and Seal Connections
Properly securing and sealing the connections between the units is essential for maintaining efficiency and preventing leaks.
- Seal the Hole in the Wall: Use weatherproof sealant around the hole where the conduit exits your home to prevent drafts and water infiltration.
- Check Connections: Ensure all connections are tight and secure. Loose connections can lead to refrigerant leaks or reduced efficiency.
Step 7: Test Your System
Once everything is connected, it’s time to power on and test your MrCool DIY Mini Split.
- Turn on the Power: Flip the switch on your electrical panel to supply power to the unit.
- Test Modes: Use the remote or control panel to test the cooling, heating, and fan modes. Make sure each mode works properly, and check that the air handler is blowing air at the set temperature.
- Check for Efficiency: Observe the system’s operation for a few hours to ensure it’s functioning smoothly and efficiently.
Benefits of Choosing MrCool DIY Direct
By selecting MrCool DIY Direct for your mini split system, you’re not just choosing a product but investing in a brand known for quality, innovation, and customer-centric design. Here are some key advantages:
- Convenience: Designed with the homeowner in mind, MrCool DIY Mini Splits simplify the installation process and eliminate the need for professional HVAC tools.
- Cost Savings: With the ability to install the system yourself, you save significantly on installation costs. Additionally, the high efficiency of MrCool systems means long-term savings on energy bills.
- Quality and Reliability: MrCool uses durable, high-quality materials, ensuring that each unit is built to last and performs reliably.
- Warranty and Support: MrCool provides a robust warranty on parts and compressor, giving you peace of mind with your investment.
Conclusion
Installing a MrCool DIY Mini Split system is a rewarding project that can transform your home’s comfort and efficiency. By following this guide and using the provided components, you’ll have a reliable heating and cooling solution installed in no time. With MrCool, you’re not just adding an air conditioning unit; you’re enhancing your home’s environment year-round.
For more information and to explore the full range of MrCool products, visit www.mrcooldiydirect.com. Whether you’re cooling off in the summer or warming up in the winter, your MrCool DIY Mini Split system is ready to provide dependable comfort tailored to your needs. Enjoy the benefits of energy efficiency, quality, and the satisfaction of a DIY project well done!

2 comments
At 240 volts (220v) the A/C will draw approximately 14.75 amps. I suggest you get a 220 volt A/C unit and install #12 gauge wire protected by a two pole 20 amp circuit breaker
for the 18000 btu mini split 240 volt what is the total wattage or how many amps does the unit pull