
Building Your Own MRCOOL DIY Multi-Zone Mini-Split System: Step-by-Step Guide
Creating your own MRCOOL DIY multi-zone mini-split system is a smart way to ensure your home is comfortable year-round. With the right planning and components, you can easily customize your heating and cooling solution. Follow this comprehensive guide to ensure a smooth and successful setup from start to finish. Use our FREE Mini-Split Configurator HERE!
Step 1: Determine the Square Footage of the Area You Want to Heat & Cool
The first step is to measure the square footage of the spaces you want to heat and cool. This will help you determine how many air handlers and BTUs (British Thermal Units) are needed.
- Measure each room: Multiply the length by the width of each room to get the square footage.
- Add up the total square footage: Combine the square footage of all rooms to calculate the total area.
Step 2: Decide the Number of Air Handlers Needed
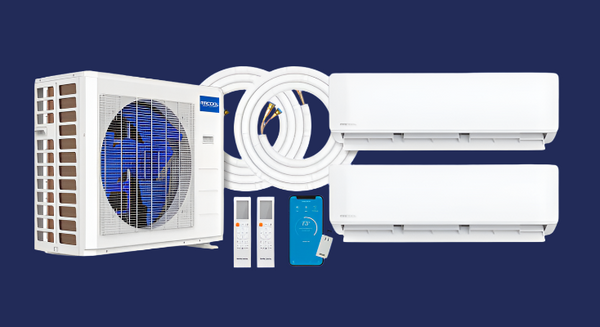
Next, decide how many air handlers (indoor units) you’ll need.
- Each zone gets its own air handler: Rooms or areas that need independent temperature control should have separate air handlers.
- 2 to 5 zones available: Depending on your system size, you can have anywhere from 2 to 5 zones, each with its own air handler.
Step 3: Choose the Type of Air Handlers
MRCOOL offers different styles of air handlers:
- Wall-Mounted Air Handlers: The most common and easy to install, typically mounted high on a wall.
- Ceiling Cassettes: Recessed into the ceiling, ideal for rooms with limited wall space.
- Combination: Mix and match wall-mounted units and ceiling cassettes depending on the needs of each zone.
Step 4: Determine the BTUs Required
Now it’s time to calculate the total BTUs required for your system.
- Calculate BTUs per room: Use an online BTU calculator or follow the rule of thumb of 20 BTUs per square foot of space.
- Distribute BTUs across air handlers: Based on your calculations, decide on the BTU capacity for each air handler, ensuring the total BTUs cover all zones effectively.
Step 5: Determine the Length of DIY Pre-Charged Line Sets
Each air handler requires a pre-charged line set to connect to the outdoor condenser.
- Measure the distance: From each air handler to where you plan to install the outdoor condenser.
- Choose the right length: Line sets come in different lengths, so select one that fits your needs. Remember, each air handler needs its own line set.
- Control wires are included: Control wires come pre-matched to the length of the line sets, so you don’t need to worry about additional wiring.
Step 6: Plan the Outdoor Condenser Mounting
Your outdoor condenser is the heart of the system and needs to be mounted securely.
-
Mounting options:
- Wall Mounting Brackets: Keeps the condenser off the ground and away from debris.
- Mounting Pads: Use composite pads or existing concrete for a stable foundation.
- Ensure level mounting: The condenser should be level and stable to avoid operational issues.
Step 7: Arrange Electrical Connections
You’ll need to connect the outdoor condenser to your home’s electrical system.
- Plan the wiring: Electrical wiring may need to run from your breaker box to the condenser.
- Add electrical accessories: Consider purchasing electrical wire whips and disconnect boxes, available as add-ons.
- Consult an electrician: If you’re unfamiliar with electrical work, it’s recommended to consult a licensed electrician to ensure proper setup.
Step 8: Gather Necessary Tools and Accessories
Make sure you have the tools and accessories required for installation.
- Common hand tools: Screwdrivers, wrenches, and a level.
- MRCOOL Tool Kit: Available as an add-on, this kit includes everything you need for a smooth installation.
Step 9: Assemble and Install Your System
With all your components and tools ready, it’s time to assemble your system.
- Follow the installation instructions: Detailed instructions come with the kit to guide you through the process.
- Connect air handlers to the condenser: Using the pre-charged line sets and control cables, connect each air handler to the outdoor condenser.
Step 10: Enjoy Your New Climate-Controlled Spaces
Once installation is complete, you can enjoy efficient heating and cooling in every zone of your home, customized to your exact preferences.
Final Thoughts and Support
Building your own MRCOOL DIY multi-zone mini-split system is a rewarding project that provides customized comfort while saving you money. If you need assistance at any point during the installation process, MRCOOL DIY Direct is here to help. We offer expert advice, detailed guidance, and all the components you need for a successful installation.
Happy building!