
Beginner’s Guide to MRCOOL DIY Mini Splits: The Ultimate Home Heating & Cooling Solution
Welcome to the world of MRCOOL DIY Mini Splits! If you’re looking for an energy-efficient, cost-effective, and easy-to-install heating and cooling solution, you’re in the right place. This guide is designed for beginners, explaining how MRCOOL DIY Mini Splits work, their benefits, and why they’re an excellent choice for homeowners.
🔹 What Is a MRCOOL DIY Mini Split?
A MRCOOL DIY Mini Split is a ductless HVAC system that allows for zoned heating and cooling without requiring traditional ductwork. Unlike central HVAC systems, these units are easier to install, making them ideal for:
✔️ Older homes without ductwork
✔️ Room additions, garages, basements
✔️ Offices & workshops needing independent climate control
✔️ Energy-conscious homeowners looking to cut utility costs
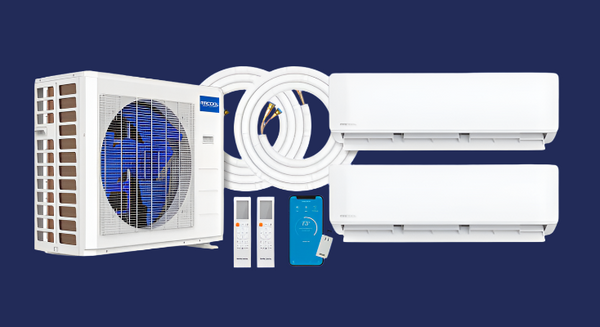
💡 How It Works:
✔️ Outdoor Unit (Compressor/Condenser) – Absorbs and releases heat
✔️ Indoor Unit(s) – Blows warm or cool air into your home
✔️ Pre-Charged Line Set – Connects the two units and circulates refrigerant
✔️ Smart Controls – Adjusts settings via remote, thermostat, or smartphone app
🔹 Key Features of MRCOOL DIY Mini Splits
✅ 1. True DIY Installation – No HVAC Technician Required
MRCOOL DIY Mini Splits are specifically designed for homeowners to install themselves.
✔️ Pre-charged refrigerant lines eliminate the need for a professional to handle refrigerant.
✔️ Easy Quick Connect fittings make setup simple.
✔️ No special tools or HVAC experience required!
💡 You can install a MRCOOL Mini Split in just a few hours and save hundreds (or even thousands) on labor costs!
✅ 2. Energy Efficiency = Big Savings
MRCOOL Mini Splits are designed for maximum energy efficiency, meaning:
✔️ Lower energy bills compared to traditional HVAC systems
✔️ Inverter technology optimizes power use, reducing waste
✔️ High SEER ratings ensure cost-effective performance
💡 Switching to a high-efficiency MRCOOL Mini Split can save you up to 30-50% on energy costs!
✅ 3. Zoned Comfort – Control Individual Rooms Separately
Unlike central HVAC systems, MRCOOL Mini Splits allow you to set different temperatures in different rooms.
✔️ No more wasting energy heating or cooling empty spaces
✔️ Each room can be customized to personal comfort levels
✔️ Perfect for home offices, guest rooms, and garages
💡 With zoned climate control, every part of your home stays comfortable while using less energy!
✅ 4. Improved Indoor Air Quality 🌿
MRCOOL Mini Splits come with advanced filtration systems to:
✔️ Reduce dust, allergens, and pollutants
✔️ Improve air circulation & humidity control
✔️ Create a healthier indoor environment
💡 Great for allergy sufferers and households with pets!
🔹 How Does a MRCOOL DIY Mini Split Work?
The process is simple and highly efficient:
💨 Step 1: Heat Exchange (Cooling Mode)
✔️ Warm indoor air is drawn into the indoor unit.
✔️ Refrigerant absorbs heat and transfers it outside.
✔️ Cool air is blown back into the room.
🔥 Step 2: Heat Pump Reversal (Heating Mode)
✔️ In cold weather, the process reverses.
✔️ Heat is pulled from outdoor air and transferred inside.
✔️ Your home stays warm without burning fossil fuels!
💡 Because heat pumps move heat instead of generating it, they are much more energy-efficient than traditional furnaces or space heaters.
🔹 How to Install a MRCOOL DIY Mini Split
One of the biggest advantages of MRCOOL Mini Splits is that you can install them yourself without professional help.
🛠️ Tools You’ll Need
Most of what you need is included in the kit, but you may also need:
✔️ Drill & drill bit (for wall hole)
✔️ Screwdriver & level
✔️ Stud finder (for mounting)
✔️ Wrench & pliers
🔧 Step-by-Step Installation
✔️ Step 1: Mount the Indoor Unit
- Choose a wall location with good airflow.
- Secure the mounting bracket and attach the indoor unit.
✔️ Step 2: Drill a Small Hole
- Drill a hole through the wall for the refrigerant line, power cable, and condensate drain.
✔️ Step 3: Install the Outdoor Unit
- Place it on a flat, stable surface (like a concrete pad or wall bracket).
✔️ Step 4: Connect the Pre-Charged Line Set
- Simply attach the Quick Connect fittings (no special tools needed).
✔️ Step 5: Power It Up!
- Double-check connections and turn on your system.
- Enjoy instant heating or cooling!
💡 Pro Tip: Always follow the included installation guide and safety precautions. If you’re unsure, consult a professional.
🔹 Why Homeowners Are Choosing MRCOOL DIY Mini Splits
⭐ No ductwork required – Great for older homes & renovations.
⭐ Lower energy bills – High efficiency = big savings.
⭐ DIY installation – Save money on labor costs.
⭐ Quiet operation – Enjoy peace & comfort.
⭐ Remote & WiFi control – Adjust settings from your smartphone.
💡 "This was the best investment for my home! I installed it myself in just a few hours, and my energy bills have dropped significantly!" – Sarah W.
🔹 Conclusion: Is a MRCOOL DIY Mini Split Right for You?
If you’re looking for a cost-effective, energy-efficient, and easy-to-install HVAC solution, MRCOOL DIY Mini Splits are a perfect choice.
🔥 Enjoy year-round comfort with zoned heating & cooling!
💰 Save money with DIY installation & reduced energy costs!
📲 Control your system remotely for ultimate convenience!
🚀 Ready to upgrade your home? Shop MRCOOL DIY Mini Splits today at www.mrcooldiydirect.com!